Making the switch from PC to Mac and want to bring your iTunes Library with you? There's more than one way to skin this cat, but here's a relatively painless method we used recently. We like this technique for its simplicity, however, there are drawbacks. If you've invested a lot of time creating custom playlists, adding album art, and rating songs within iTunes, that metadata will not copy over using the instructions outlined below. Power users concerned about transferring every bit of metadata from their old iTunes library will need to take the longer road of exporting and tweaking an iTunes XML file (not covered here). With that warning, here's a quick method for migrating your iTunes library.
1. Setting the stageFirst, make sure you're running the latest version of iTunes on both your Mac and your PC.2 . If you have an iPod, make it cross-platformJust because you've brought a Mac into your home, doesn't mean your old PC is chopped liver. You never know when you may want to sync your iPod back to your PC, just for old time's sake. This step will allow you to sync your iPod to both your Mac and your PC, without any hassles. To do this, connect your PC-formatted iPod to your Mac. iTunes will launch and present you with an error screen asking if you'd like to erase this iPod and sync it with the iTunes library. Don't panic. We're not going to erase your iPod. Take a deep breath and select "Cancel."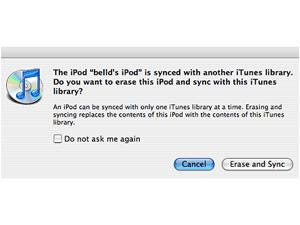
Your iPod's icon should appear in the left iTunes window pane (blue background). Select the iPod so that the Summary information for your iPod appears in the main window (see below). Check off the box marked "Manually manage music and videos." By enabling this feature, your iPod can be seen by both Mac and Windows machines without prompting you to erase or overwrite your files.
 3. Transfer purchased music to iTunes
While you've got your iPod connected to your new Mac, it's a good time to take advantage of iTunes' ability to copy purchased files from your iPod into iTunes (if only Apple made it as easy to copy the rest of your music!). We'll show you how to transfer the rest of your music collection later, but for now, let's just transfer your purchased songs (if you have any).
Go to the File menu in iTunes and select "Transfer purchases from iPod". This will trigger iTunes to scan your iPod for purchased songs and add them to your computer's music library. iTunes may ask you to reenter the Apple ID (e-mail address) and password used for your iTunes store account, in order to verify that the purchased music belongs to you. You may also want to make sure your new computer is authorized to play your previously purchased music by going to the iTunes "Store" menu and selecting "Authorize computer." With any luck, you'll be able to find your purchased music in your Mac iTunes music library now.
 4. Copying the rest of your musicMethod 1:
 If you happen to have your entire digital music collection stored on your iPod, one quick way to transfer all your files from an iPod into a Mac version of iTunes is to download and use a Mac-only application called Senuti (iTunes spelled backward).
With your iPod connected to your Mac, and the Senuti application open, you should be able to see the contents of your iPod in Senuti's iTunes-like application window. All you need to do now is select all or part of the songs on your iPod, then hit the copy button in the upper-right corner of Senuti's application window. After a few minutes of copying, your iPod's files should now all appear in your Mac's iTunes music library.
Method 2: If your music collection is larger than what can reasonably fit on your iPod, then you'll need to copy your PC's iTunes library directly onto your new computer or onto an external hard drive (you could also connect your PC and Mac together over an Ethernet connection, but that's another tutorial). Copying your library onto an external hard drive is probably the best option, since it gives you an opportunity to create a backup archive of your music.
To get started, first you'll want to make sure your PC's iTunes library is ready to transport. To make sure all your files are accounted for, open up iTunes on your PC and under the "Advanced" menu select "Consolidate library." This will make sure that all of the music and video files you see in iTunes are collected into one main iTunes library folder on your computer. This step may take seconds or several minutes, depending on how your music and libraries are organized. You'll also want to go into the iTunes preferences (found in the edit menu) and make sure that both the Advanced tab's "Keep iTunes Music folder organized" and "Copy files to iTunes Music folder…" boxes are checked (see below).
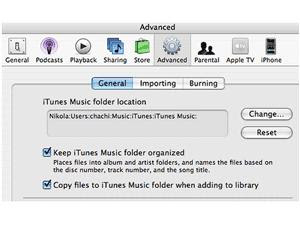
Next, you'll need to locate your PC's iTunes library folder. It should be located in the My Music folder, found in the My Documents folder on your PC's C:/ drive. Once you've found the folder named iTunes, open it up to find the folder called iTunes Music. The iTunes Music folder is the one you'll want to copy. It contains all your music organized neatly into folders.
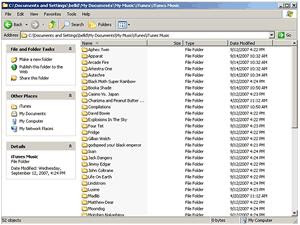
At this point, you can either drag the entire iTunes Music folder onto your external hard drive, or you can create a new folder on your external hard drive (name it whatever you want) and selectively drag in just the artists, albums, and songs that you want transferred to your Mac. Copying large libraries can take a long time, so be patient. If you have lots of old podcasts clogging your iTunes library, you may want to delete them from your library before you begin copying.
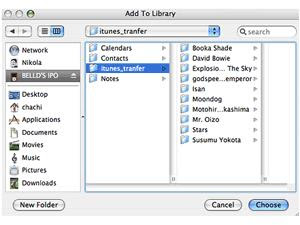
5. Importing your library onto your MacDisconnect your external hard drive from your PC and connect it to your new Mac. Now, launch iTunes on your Mac and under the File menu, select "Add to Library…".
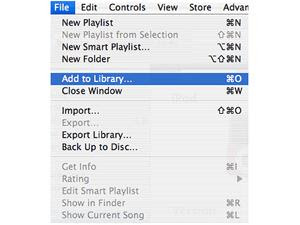
A window will pop up asking you to locate the files you want to add. Direct it to the iTunes library folder you copied onto the external hard drive and click the big blue "Choose" button.
After a few minutes, your PC's iTunes files should be available in your Mac's iTunes library. You may have to spend some time relocating album artwork for some of your old files, but it sure beats burning a spindle full of CDRs to copy your files between computers.


 Your iPod's icon should appear in the left iTunes window pane (blue background). Select the iPod so that the Summary information for your iPod appears in the main window (see below). Check off the box marked "Manually manage music and videos." By enabling this feature, your iPod can be seen by both Mac and Windows machines without prompting you to erase or overwrite your files.

 Next, you'll need to locate your PC's iTunes library folder. It should be located in the My Music folder, found in the My Documents folder on your PC's C:/ drive. Once you've found the folder named iTunes, open it up to find the folder called iTunes Music. The iTunes Music folder is the one you'll want to copy. It contains all your music organized neatly into folders.

 After a few minutes, your PC's iTunes files should be available in your Mac's iTunes library. You may have to spend some time relocating album artwork for some of your old files, but it sure beats burning a spindle full of CDRs to copy your files between computers.
